Radon Mitigation: How To Avoid Common Installation Mistakes
Many homeowners are unaware of the invisible threat lurking beneath their homes: radon. This naturally occurring radioactive gas appears when uranium in soil and rock breaks down. Radon can easily enter homes through gaps around service pipes and cracks in the floors, walls, and foundation.
Long-term exposure can cause lung cancer and a host of other health issues. That’s why understanding radon mitigation and how to avoid common installation mistakes is crucial for protecting your family’s health.
We’ll provide practical advice so you can keep your family safe. By the time you finish reading, you’ll understand the key aspects of a successful radon system installation and feel more confident about managing radon risks in your home.
Not Starting With a Thorough Radon Test
It is recommended that you test your home thoroughly before installing a radon mitigation system. Many homeowners rush this step, eager to immediately solve their issues. While it’s often fine to operate off the initial high reading when designing your mitigation system, it can sometimes create a less efficient system. This is because the extent of radon infiltration can vary throughout your property.
While a basic radon testing kit from the local hardware store is a good place to start, it’s not always enough. For particularly hard-to-solve radon infiltrations, professional radon tests can be a helpful diagnostic tool. These tests provide more specific information about radon concentration levels and entry points to address the problem at the source. With the precise data from a professional radon test, you can design a system that’s tailored to your home.
Forgetting To Seal Foundation Cracks

Foundation cracks might seem innocuous, but they’re major pathways for radon to enter your home. Seal these entry points before installing your mitigation system.
Ignoring openings around your property can lead to inefficient mitigation systems. Radon systems are designed to create a vacuum under your home, pulling the gas away before it enters your living space. If cracks remain open, they make the vacuum less effective and provide an easier path for radon to seep into your home.
Homeowners should inspect their foundations carefully and seal visible cracks or gaps with the appropriate materials to strengthen the mitigation system’s effectiveness.
Placing the Fan in an Interior Living Area
When deciding on the fan’s location, consider factors like accessibility and noise levels. The best radon fan location is one that supports an efficient mitigation system without interfering with your daily life.
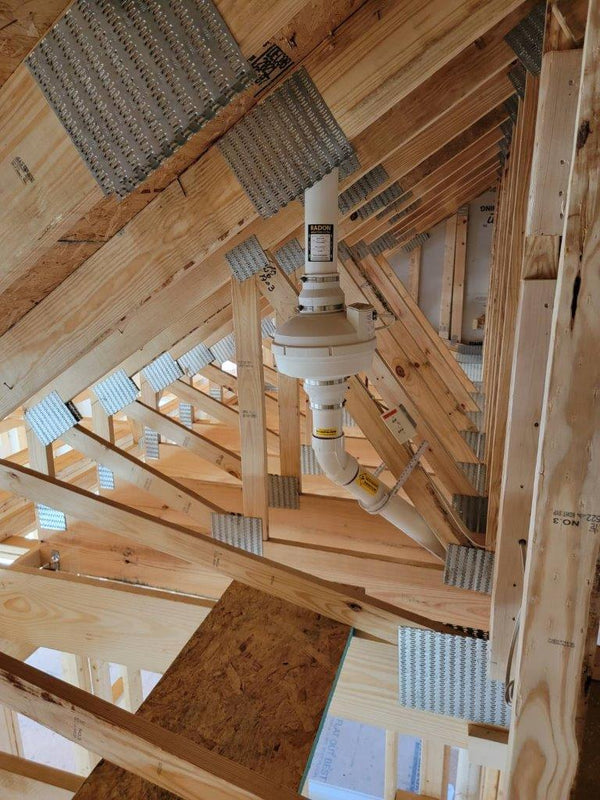
Choosing the wrong location for a radon fan can have unintended consequences, with noise being the most disruptive. That’s why you should install your radon fan on the exterior of your home or in the attic. In either of these positions, you’ll need radon fan mounting brackets to install the fan. Exterior placement reduces noise disruption and ensures that any radon vented out stays outside.
If you decide to install the fan in the attic, do it properly. A common issue with attic installation is noise that reverberates from the fan to the mitigation system’s PVC piping. If the piping isn’t properly secured, the fan’s motor can send vibrations down the pipe and cause excess noise. To prevent this issue, make sure the mitigation piping inside the wall is securely installed. We also recommend inserting insulation between the pipe and the wall to prevent noise.
Improperly Placing the Radon Exhaust Pipe

The exhaust pipe safely vents radon from your home, where it can safely disperse into the atmosphere. The top of the vent pipe should be 12 inches above the roofline and at least 10 feet from windows or doors. Placing the vent too close to your doors and windows can cause radon to reenter your home. Local safety guidelines will often include this placement as a safety regulation. If you have questions about where to install your radon exhaust pipe, reach out to your local municipality or radon fan distributor.
Installing Low-Quality Materials
Whether you’re working on a DIY radon mitigation system or hiring a pro, you must use high-quality materials. A common mistake homeowners make is using 20 PVC piping rather than 40 PVC pipe. The 40 PVC pipe is the recommended product since it has thicker sidewalls and can handle more pressure. Since radon fans create a vacuum to pull radon from below your home, you must have PVC pipe that can handle high pressure.
Lower-quality materials degrade over time, especially in cold or sunny weather, leading to leaks or system failures and putting your home at risk for increased radon levels. Investing in high-quality materials from the start prevents these issues and increases radon control.
Not Installing the Manometer Correctly
A manometer confirms whether your radon system is working properly. Without a well-installed manometer, you could miss the warning signs of system failure or inefficiency, which can lead to unchecked radon levels.
The manometer provides real-time feedback on system pressure, indicating whether it’s functioning as expected. For the most accurate readings, install the manometer below the fan and adjust it to zero. Check the device regularly to confirm that your system is operating correctly.
Not Hiring an Electrician To Wire the Radon Fan
Radon fans run continuously, so proper electrical wiring is crucial for a functional radon system. If you don’t have the electrical wiring to support a radon fan, you should hire a qualified electrician to handle this step. If the fan uses an outdoor electrical connection, it must be waterproof to prevent hazards. Incorrect wiring can result in fan failure or even pose a fire risk.
Being Afraid To Ask for Help
Installing a radon mitigation system can be challenging, but it’s an option for homeowners, nevertheless. As with any DIY project, recognize when you need extra guidance. You can review our online resources, watch our step-by-step YouTube videos, or give us a call. We’re always willing to guide you through the process of installing and maintaining your radon mitigation system.
That being said, if you feel out of your depth, you can always hire a certified radon mitigation contractor to handle installation for you. Once the system is in place, many homeowners can handle maintenance or part replacements.
Radon mitigation is a critical step for homeowners to safeguard their families from the health risks of radon gas. Understanding common installation mistakes and how to avoid them ensures your mitigation system works effectively from the start.
Remember that radon exposure can have severe health consequences, so you must take proactive measures. If you’re concerned about radon levels in your home, don’t hesitate to seek professional advice and take the necessary steps to protect your loved ones.

