
Professional vs. DIY Radon Mitigation: Pros and Cons
Radon gas is a silent intruder in many homes—a colorless, odorless gas that can pose serious health risks. Luckily, installing a mitigation system can significantly lower radon levels to improve the safety of your home. For homeowners tackling this issue, the big question often boils down to professional vs. DIY radon mitigation. Both options come with their pros and cons, and understanding them can help you make the right choice for your home and family. This guide breaks down these two approaches based on factors such as cost, effectiveness, and safety so that you can decide which route is best for you.
What Is Radon Mitigation?
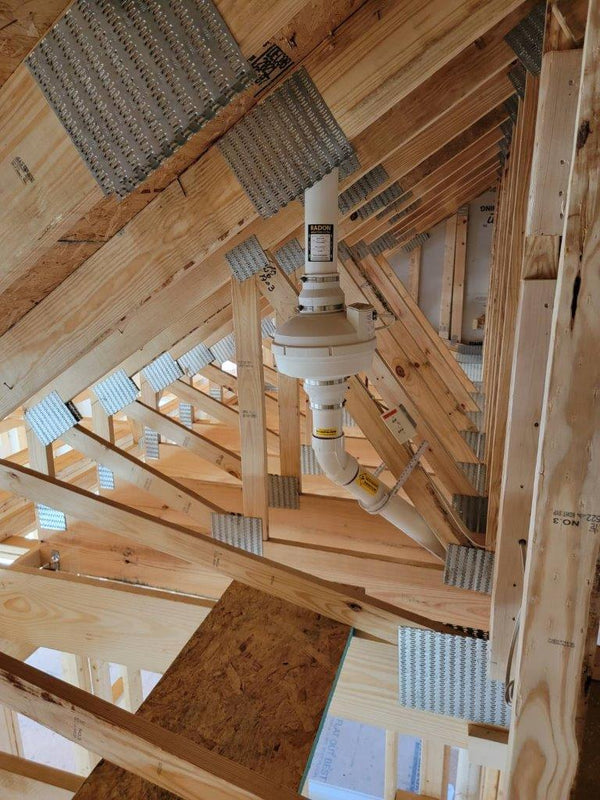
Radon mitigation involves reducing radon levels in your home to safe standards, usually below the EPA’s action level of 4 picocuries per liter (pCi/L). This process typically involves installing a radon reduction system, including a PVC vent pipe and a motorized fan, to direct radon gas away from your home.
Let’s dive into the pros and cons of professional vs. DIY radon mitigation to help you compare the two options.
Effectiveness in Reducing Radon Levels
Professional Radon Mitigation
Professional services are highly effective because trained experts will assess your home, test radon levels, and customize the mitigation system based on your home’s layout and construction. Certified professionals have access to advanced radon-detecting tools, specialized training, and installation techniques that increase the likelihood of achieving long-term radon reduction.
DIY Radon Mitigation
DIY systems can also be effective, but their success depends on your understanding of the mitigation process and installing the components correctly. While DIY options tend to work well in simpler homes with slab foundations or crawl spaces, homeowners may struggle with installation if their home has a drain tile system or hollow block foundation walls. However, if you carefully follow reputable DIY guidebooks and kits, you can still achieve effective radon reduction.
If you have a straightforward radon issue and are confident in your skills, DIY methods can work well. For more challenging situations, hiring a professional ensures higher accuracy and reliability.

2. Upfront and Long-Term Costs
Professional Radon Mitigation
Hiring a professional radon mitigation technician typically costs between $1,000 and $2,000, depending on your geographical location, your home’s size, and its foundation type. While this upfront cost is higher, professionally installed systems are designed for long-term performance with minimal maintenance, offering good value over time.
DIY Radon Mitigation
DIY radon mitigation is much more budget-friendly upfront, with costs ranging from $300 to $600 for materials such as a radon reduction fan and PVC piping. However, you may face additional costs, especially if there isn’t an existing electrical supply for the fan. In that case, you’ll need to hire a licensed electrician.
DIY options are great for limited budgets, while professional installation is ideal for those who are able to prioritize a long-term, worry-free investment.
3. Installation Complexity and Time
Professional Radon Mitigation
A professional installer handles the entire process, from testing radon levels to selecting the correct system and ensuring proper installation. Most installations take just a few hours, minimizing disruption to your daily life.
DIY Radon Mitigation
Going the DIY route means doing everything yourself, from diagnosing the problem to sourcing materials and installing the system. Installation complexity varies depending on your experience and your home’s layout. For a homeowner with basic tools and skills, it may take a full weekend or more to complete the process.
Professionals save you time and effort. Conversely, DIY requires careful planning but offers a rewarding experience for hands-on homeowners.
4. Safety Considerations for the Household
Professional Radon Mitigation
Safety is a top priority for licensed radon mitigation contractors. They’re trained to avoid issues such as improper airflow, electrical hazards, or potential radon gas leaks during installation. Additionally, they ensure systems meet all safety standards.
DIY Radon Mitigation
DIY installation requires a solid understanding of radon mitigation techniques. Mistakes can pose risks, such as improper sealing or inadequate ventilation, which could expose your household to radon gas. However, with thorough research, you can minimize these risks.
Takeaway: If safety is a concern, professional assistance offers a more secure option. Confident DIYers should proceed only after researching safety guidelines.
5. Time to See Results
Professional Radon Mitigation
Professional systems are functional and effective immediately after installation. With expert assessment and setup, you’re likely to see a significant drop in radon levels within hours.
DIY Radon Mitigation
DIY installations may take longer to deliver results depending on how quickly you set up and test the system. It may also take additional time to adjust or troubleshoot if the system does not initially perform as expected.
Professionals provide quicker results, but dedicated DIY attempts can still be effective with patience.
6. Warranty and Guarantees
Professional Radon Mitigation
Most professional services include warranties or guarantees on their systems, offering additional assurance that the work will meet your expectations. You can also count on their help if the system needs repairs or adjustments.
DIY Radon Mitigation
DIY kits typically come with limited warranties on individual system components, such as fans or manometers, but you’re often on your own for troubleshooting issues with the system as a whole.
A warranty-backed professional system delivers greater peace of mind, while DIY systems require more self-reliance.

7. Regulatory Compliance and Certification Requirements
Professional Radon Mitigation
Licensed radon professionals are well-versed in local regulations and certification requirements. They’ll ensure your system complies with any necessary guidelines, which is particularly important if you’re planning to sell your home.
DIY Radon Mitigation
DIY solutions don’t always meet regulatory standards, which could lead to complications if your system requires inspection during the selling process.
Professionals handle regulatory headaches, while diligent DIYers must research and ensure compliance on their own.
Professional vs. DIY Radon Mitigation: The Final Verdict
At the end of the day, the choice between professional and DIY radon mitigation depends largely on your budget, skills, and the complexity of your home’s radon issue.
- Choose professional mitigation if you’re looking for guaranteed results, expert oversight, safety assurance, and long-term reliability. It’s an especially good choice for homes with major radon issues or complex layouts.
- Go for DIY mitigation if you’re working within a tight budget, have a straightforward radon issue, and enjoy tackling hands-on projects around the house. By following proper guidelines, you can save money and achieve effective results.
No matter which path you take, addressing radon in your home marks a critical step toward ensuring a healthier living environment. Choose the option that aligns with your priorities, and don’t hesitate to reach out to radon experts if you need guidance along the way.