
5 Tips for Reducing Radon Levels Quickly
If you've tested for radon and received a high reading, you might be searching for effective tips for reducing radon levels quickly. Radon is an invisible, odorless gas that can pose serious health risks if left unchecked. It's linked to lung cancer and affects homeowners across the globe—many of whom have no idea there's an issue until they test their homes. Luckily, there are actionable steps you can take to bring radon levels under control.
We’ll walk you through what radon is, why it’s dangerous, and, most importantly, how to reduce its levels quickly using both immediate fixes and long-term methods. By the end of this guide, you’ll feel confident knowing your home is safer for you and your family.
What Is Radon and Why Is It Dangerous?
Before jumping into solutions, it's important to understand what radon is and how it affects your home. Radon is a radioactive gas that arises from the decay of uranium in soil and rocks. Foundation cracks and gaps in walls and floors can let radon into your home.
Health Risks of Radon Exposure
Prolonged exposure to high radon levels can significantly increase the risk of lung cancer. It’s estimated that radon causes tens of thousands of lung cancer deaths annually in the US, making it a major health concern for homeowners. Smokers living in homes with elevated radon levels face even greater health risks.
Acceptable Radon Levels
Regulatory standards recommend keeping radon levels below 4 picocuries per liter (pCi/L). However, even lower levels (such as 2 pCi/L) can still pose health risks, so reducing radon as much as possible is always a good idea.
When a Test Reveals High Radon Levels: What To Do Next
Testing your home is the first step to addressing radon. If your results show levels above 4 pCi/L, take action right away.
Conduct a Second Test
Radon levels can fluctuate, so it’s a good idea to conduct a follow-up test using a second DIY radon test kit. Take the average of the two results to get a clearer picture of the situation.
For ongoing monitoring, investing in a continuous radon monitor, such as the EcoBlu or EcoQube, can provide real-time data and help you understand fluctuations over time.
Understanding the Severity
Radon levels between 2 and 3.9 pCi/L indicate that you should take remedial action soon. Levels above 4 pCi/L require immediate steps to reduce exposure. The higher the reading, the more urgent the need to mitigate.
Immediate Short-Term Reduction Tips
Here are actionable steps to reduce radon levels quickly while you work on implementing long-term solutions:
- Increase ventilation: Open windows and doors to improve airflow. Use fans to circulate indoor air and draw in fresh air from the outside. While this is a temporary fix, increased ventilation can lower radon levels significantly for a short period of time.
- Use fans strategically: Place fans near windows or doors to help push radon-rich air out of the home. You can also install exhaust fans to improve airflow in lower levels of your home, such as the basement.
- Seal cracks and openings: Radon enters your home through cracks in the foundation, walls, and floor. Use radon-resistant caulks and sealants to cover these openings. Don’t overlook areas around pipes, wiring, and sump pumps.

Mid-Range Mitigation Techniques
Once you’ve temporarily lowered radon levels, focus on medium-term solutions to enhance your home’s protection.
- Enhance a sump pump system: If your home already has a sump pump system to prevent flooding, you can significantly reduce radon by attaching a radon ventilation system to the sump. Think of this as a two-for-one system that prevents water from entering your basement and lowers radon gas.
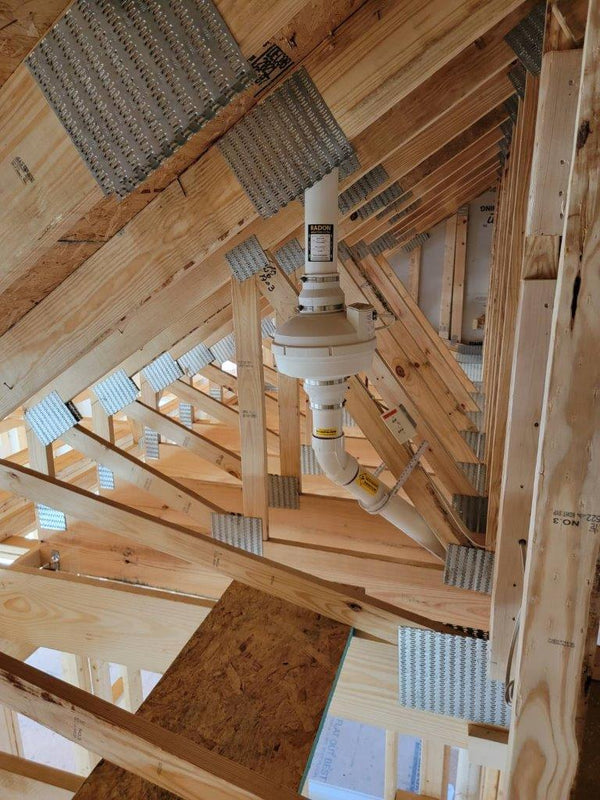
- Upgrade a passive radon system: Homes with existing passive radon systems will benefit from adding a radon mitigation blower. These blowers create negative pressure, which is what pulls radon to the exhaust pipe and away from your home.
- Caulk entry points for pipes and wiring: Go a step further with sealing by paying special attention to all entry points for utilities. Use high-quality seals and fillers to comprehensively block radon entry paths.
Long-Term Radon Reduction Strategies
To keep your radon levels consistently low, consider investing in long-lasting solutions.
- Install an active soil depressurization (ASD) system: ASD systems are among the most effective long-term solutions for radon mitigation. These systems use a fan and vent pipe to continuously draw radon gas from beneath your home and release it outdoors. Professional installation ensures maximum effectiveness, although skilled DIYers have successfully installed these systems, too.
- Maintain ventilation systems: Once your ASD system is installed, regular maintenance is essential. Check vents and fans periodically to ensure proper airflow and prevent blockages.
- Encapsulate the crawl space: Homes with crawl spaces are particularly susceptible to radon. Encapsulation, or sealing the crawlspace with a vapor barrier, can help. Additionally, increasing ventilation in these areas can further reduce radon buildup.

Lifestyle Changes To Minimize Radon Exposure
Beyond structural solutions, small lifestyle changes can help reduce your overall exposure to radon.
- Spend more time outdoors: Reducing the time you spend in radon-prone areas of your home minimizes exposure to the gas. Spend more time in your garden or outdoor spaces instead.
- Improve indoor air quality: Invest in air purifiers that are proven to reduce indoor pollutants. While these devices won’t significantly reduce radon, they can improve overall air quality and give you added peace of mind. You can also periodically open windows to let in fresh air.
- Schedule regular home maintenance: Make it a habit to inspect your home for cracks, leaks, and areas where radon might enter. Keeping your home in good condition is key to long-term safety.
When To Call a Professional
Sometimes, the best course of action is hiring a professional radon mitigator. Here’s what you need to know to hire the best expert for the job.
Certification and Licensing
Look for radon specialists certified by the National Radon Proficiency Program (NRPP) or similar organizations. Licensed professionals ensure compliance with safety standards.
Cost Expectations
Professional radon mitigation typically costs between $800 and $1,500, depending on the size of your home and the complexity of the system. This is a worthwhile investment that can safeguard your family’s health for years to come.
Making Your Home Safer Today
Taking action to address radon is crucial for every homeowner, and it’s easier than you might think. With these tips for reducing radon levels quickly, you can create a safer environment for your family and significantly lower long-term health risks.
If you’re ready to take the next step, explore certified radon mitigation professionals in your area, invest in a reliable radon monitor, or roll up your sleeves and take on a DIY project. Peace of mind is just a few steps away.